The first step called fetch involves retrieving the instructions from the device memory, and the location is determined by the Program Counter which stores and identifies the location of all of the instructions.
The next step (decode) involves changing the instructions into parts which have significance to the processor, as not all of the instructions can be done by a specific part of the processor.
After these, the execute step is performed. In this step, multiple parts of the processor are connected in order to perform the tasks given in the instructions. If a result of a calculation performed by the processor is too large, the arithmetic over flow flags can be set to prevent damage to the processing unit.
The final step write back simply replaces the instructions which are saved in the memory with the end result. After this, the cycle is continued and the next set of instructions is ‘fetched’ from the memory.
All processors are made with different clock speed, but basically the faster the clock speed, the faster the processor will run through the above cycle. Furthermore, some processors offer a ‘Dual Core’ which means that there is more than one processor within the processor chip. Both (or all if a quad core) processors will work simultaneously to work through the waiting instructions in the bus and complete them quicker than one processor on its own.
Many people get scared when it comes to removing/ replacing the processor as they fear it will break. As long as you follow the below safety steps and instructions, there should be no damage to the CPU. To start off, the technician will need the following equipment…
· Non-magnetic Philips screw driver
· Anti-static bag to place old CPU in
· Replacement CPU that will work with the existing motherboard.
· A method of organising the replaced screws.
To start replacing the CPU, follow these instructions…
1. Make sure that the computer and you are earthed, as to not damage any of the equipment.
2. Remove the outer casing of the chassis, by unscrewing the 2 screws on the back of the computer. Place the screws somewhere safe and the casing out of the way.
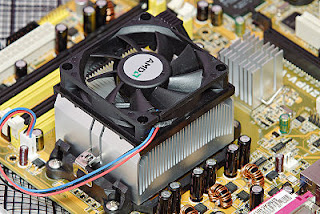
3. Next, identify the CPU on the motherboard. Typically, it is hidden underneath a fan and heat sink which looks like the following…
 |
| Fan & Heatsink Connected to Motherboard |
4. Remove the screws which hold the fan and heat sink to the motherboard.
5. After unplugging the fan power cable, remove the heat sink and fan.
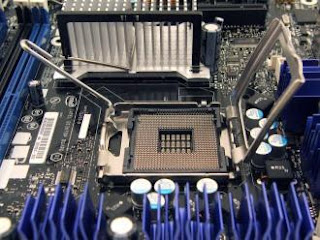
6. Identify the lever which lies next to the CPU, and gently lift until the processor is lifted and ready to be removed.
 |
| The Processor (CPU) inserted in the CPU Socket of the Motherboard |
7. Gently lift the CPU out of the chassis and place it in an antistatic bag.
Now it’s time to replace it with a new CPU, make sure it is safely out of the packaging.
8. Place the new CPU in the same position and alignment as the old CPU was above the CPU socket.
9. After ensuring the CPU is correctly placed, push down the lever until the processor snaps into place on the socket.
10. Replace the Fan and Heat sink above the processor, in the same position as they were removed.
11. Replace all of the screws back through the fan and heat sink, and screw them gently to the motherboard until firm.
12. Plug in the CPU fan to the power socket it was removed from.
13. Replace the side of the chassis, and unplug the antistatic equipment.
Done, after configuring it in the BIOS, the new CPU should be working correctly.


No comments:
Post a Comment